Watch movies with your friends on Zoom
Created:Last modified: 23 Aug 2022 see history
englishlinuxsoftwaremanjaropipewire
Introduction #
A few years ago, Skype was the star of the voice-over-IP revolution. Microsoft had everything to make Skype the de facto standard for IM, call/video meetings, and, who knows, even work chat.
A lot has happened since Microsoft acquired Skype in 2011. SMS, WhatsApp, iMessage, FaceTime, Google Meet, Microsoft Teams, Slack, and Zoom, among others, share the market of connecting people over text, audio, and video.
Zoom gained a lot of attention in 2020 when the COVID-19 pandemic forced us to stay inside, so we needed ways to connect with coworkers and friends. I decided to use Zoom in the title of this post just because it became a synonym of video call, but, strictly speaking, the method described here works for most video call solutions, including Google Meet and, my personal favorite, Jitsi Meet.
The challenge #
Video call solutions implement standard features like video and audio but they usually offer optional features as well like drawing, text chat, and screen sharing.
If two users want to watch a video together, they could enable screen sharing. This solution, however, is usually far from perfect.
From all the video calling apps I have tried, Zoom has probably the best results. Its screen sharing feature has an option to optimize for audio. Enabling this flag, users could share their screen and play a video using a standard video player. In my humble opinion, the results are not good enough for a pleasant experience. The screen share stream is not fluid enough, usually limited to a low framerate.
The setup #
My usual setup is Manjaro Linux, so I'll consider it as the base setup for this experiment. This method should work on other distributions (in fact, I have tried it on Ubuntu 22.04). It's even possible to use similar software on Windows, but that's out of the scope of this post.
To get the best quality, we must consider both video and audio.
The Video #
As mentioned before, video call solutions usually have two ways to share a video stream. One of them is the webcam. The second one is the screen sharing feature. Since screen sharing usually has low framerate and quality issues, we will use the webcam stream to share the movie player.
Linux implements an API that video call and other video-related applications can use to access webcams, TV tuners and similar devices. It's called Video4Linux. Since this is just an API, applications don't know the source of these video streams. It is possible then to create a virtual video device that could, for example, just play a video in an infinite loop or, in our case, get the full computer screen.
v4l2-loopback is a module that creates a virtual device so we can use it to stream our local desktop to a video calling app just as if it was a webcam. We will need FFmpeg as well.
Install the software:
sudo pacman -S \
  linux-headers \
  dkms \
  v4l2loopback-dkms \
  v4l2loopback-utils \
  ffmpeg
Please note that I use linux-headers here. If you don't use the default kernel, you might need to install other packages to make DKMS work. Refer to the DKMS entry in the Arch wiki for more details.
Now, we can load the v4l2loopback module:
sudo modprobe v4l2loopback exclusive_caps=1 card_label="my screen"This command will create a new virtual Video4Linux device. You can list all your Video4Linux devices by running ls /dev/video*. In my case, the new device is /dev/video2, so I'll use that name for my example. The option exclusive_caps=1 is needed so Google Chrome can recognize the camera.
Finally, we can run ffmpeg to capture the desktop and send it to the new virtual device:
ffmpeg \
  -f x11grab \
  -r 30 \
  -s 1280x720 \
  -i :0.0+0,0 \
  -vcodec rawvideo \
  -pix_fmt yuv420p \
  -threads 0 \
  -f v4l2 \
  /dev/video2
Note that the desktop resolution is included here (1280x720). Adjust this parameter if needed. This command should be running while the video call is in progress.
We used -r30 for ffmpeg so the framerate will be 30 and the video should be fluid enough.
That's it. Now the virtual video device with the desktop capture will be available on apps like Zoom or Google Meet running in Google Chrome. Just make sure to select my screen as your webcam.
The Audio #
The solution to share audio with other users via a video call app is a bit different than the one to share video. This is because both parties, local and remote, need to listen to the audio from the movie, but not all the local desktop audio should be sent back to the remote party. Doing so would send back the own remote party audio, which is technically possible but not a pleasant experience for that party.
This is a diagram of what would happen if we just send all the local audio to the remote party:
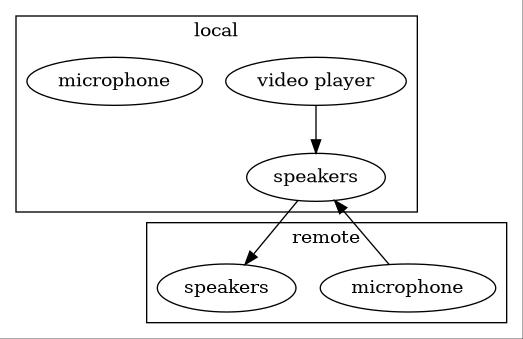
Another side effect of this approach is that the local microphone audio is not sent to the remote speakers either.
Of course, a possible solution would be to send the audio from all local applications to the remote party who could mute themselves and talking during the movie would just not be possible, which is not really a good experience if you ask me.
This is a common issue with TV or radio stations that need to send the audio back to remote journalists or callers who should receive all the audio from the main audio mix except their own voice. This is known as a mix-minus because they need a mix of everything minus their own voice.
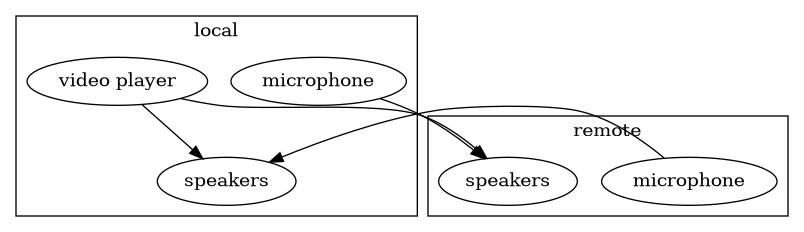
This is a list of the technical requirements of the ideal solution:
- Video player audio should be sent to local and remote speakers
- Remote mic audio should be sent to the local speakers
- Remote mic audio should not be sent to remote speakers
- Local mic audio should be sent to the remote speakers
- Local mic audio should not be sent to local speakers
This is a diagram of that ideal solution:
Now, the audio-related Linux landscape is kind of complicated. The standard API for audio devices is ALSA (Advanced Linux Sound Architecture). Nowadays, apps rarely use ALSA directly tho. Most Linux distributions and desktop environments include a sound server running over ALSA. PulseAudio is the most common sound server.
PulseAudio by itself is not enough to implement these complex audio routing rules. A way to accomplish this is to use JACK Audio alongside PulseAudio. One downside of JACK is that it uses a different API than PulseAudio, so it is necessary to use a plugin and run both JACK and PulseAudio to support all applications. I have used JACK before to accomplish this, but it's not really easy to use.
Since its creation, PipeWire has been slowly replacing PulseAudio since it offers extra features, including complex audio routing. PipeWire solves the issues JACK has by adding JACK features and replacing PulseAudio while maintaining the same PulseAudio API, so applications that already support PulseAudio can continue working without modifications.
At the current date (8/21/2022), Linux distributions usually support PipeWire but it's not installed or enabled by default. This is the case in Ubuntu 22.04. It was announced that PipeWire will be default audio server in Ubuntu 22.10 to be release next month.
Manjaro does not ship PipeWire by default, but it can be easily installed by running:
sudo pacman -S manjaro-pipewireThis command will prompt for a few options and will uninstall PulseAudio. After a reboot, PipeWire will be running as the default audio server we should be ready to implement our audio solution.
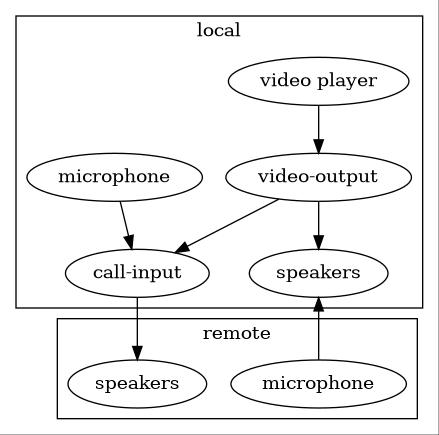
We will need to create two virtual audio devices that will be used to create the audio routing rules:
video-output: Will be a virtual sink device, which means that it can receive audio from applications. In simple words, it will act as virtual speakers for our video player.call-input: Will be a virtual source that will be able to send audio to our video call app. In other words, it will act as a virtual microphone for our video call application.
After these two virtual devices are created, we just need to add some rules to connect them to the real microphone and speakers.
This is a diagram of the solution including these two virtual devices:
This is the bash script to create the virtual devices and connections. Make sure to replace the first two variables with your own hardware devices. You can list your devices by running pw-link -io.
# Hardware devices
MICROPHONE_DEVICE="alsa_input.pci-0000_00_1f.3.analog-stereo"
SPEAKER_DEVICE="alsa_output.pci-0000_00_1f.3.analog-stereo"

# Virtual devices
VIDEO_OUTPUT_DEVICE="video-output"
CALL_INPUT_DEVICE="call-input"

# Create virtual devices
pactl load-module \
  module-null-sink \
  media.class=Audio/Sink \
  sink_name="$VIDEO_OUTPUT_DEVICE" \
  channel_map=front-left,front-right
pactl load-module \
  module-null-sink \
  media.class=Audio/Source/Virtual \
  sink_name="$CALL_INPUT_DEVICE" \
  channel_map=front-left,front-right

# Connect microphone to call input
pw-link \
  "$MICROPHONE_DEVICE:capture_FL" \
  "$CALL_INPUT_DEVICE:input_FL"
pw-link \
  "$MICROPHONE_DEVICE:capture_FR" \
  "$CALL_INPUT_DEVICE:input_FR"

# Connect video-output to call-input
pw-link \
  "$VIDEO_OUTPUT_DEVICE:monitor_FL" \
  "$CALL_INPUT_DEVICE:input_FL"
pw-link \
  "$VIDEO_OUTPUT_DEVICE:monitor_FR" \
  "$CALL_INPUT_DEVICE:input_FR"

# Listen video on the speakers
pw-link \
  "$VIDEO_OUTPUT_DEVICE:monitor_FL" \
  "$SPEAKER_DEVICE:playback_FL"
pw-link \
  "$VIDEO_OUTPUT_DEVICE:monitor_FR" \
  "$SPEAKER_DEVICE:playback_FR"
After running this script, we just need to make sure we use the right virtual devices for each application.
For our video player, we should select video-output as the sink. This can be done by using pavucontrol or another PulseAudio front-end app. Start playing a video and then, in pavucontrol, go to the Playback tab. You will see the video player listed there and a dropdown at the right side where you can select video-ouput as the sink for that audio stream.
This is what I see when using Google Chrome to play a video from YouTube:
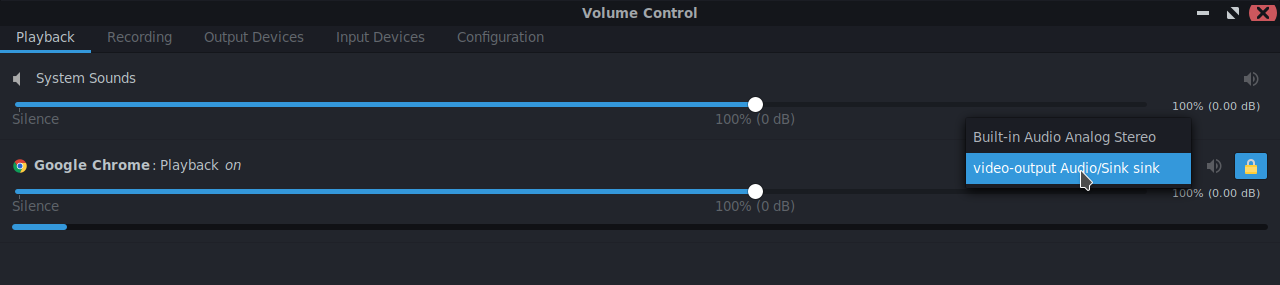
We also neeed to select call-input as the microphone in our video call software. This is usually done directly in the video calling software. On zoom, just click on the arrow right to the microphone/mute button and select call-input as your mic.
UPDATE: The Mute Button #
If you need to mute your local microphone without muting the audio stream coming from the video player, you can use the following script. I have a shortcut assigned to it, so I can quickly mute/unmute the microphone at any time.
# Devices
MICROPHONE_DEVICE="alsa_input.pci-0000_00_1f.3.analog-stereo"
CALL_INPUT_DEVICE="call-input"

# Count
COUNT=$(pw-link -il "$CALL_INPUT_DEVICE" | grep -c "$MICROPHONE_DEVICE")

if (( COUNT > 0 ))
then
    # Mute
    pw-link -d \
      "$MICROPHONE_DEVICE:capture_FL" \
      "$CALL_INPUT_DEVICE:input_FL"
    pw-link -d \
      "$MICROPHONE_DEVICE:capture_FR" \
      "$CALL_INPUT_DEVICE:input_FR"
    notify-send -t 500 "muted"
else
    # Unmnute
    pw-link \
      "$MICROPHONE_DEVICE:capture_FL" \
      "$CALL_INPUT_DEVICE:input_FL"
    pw-link \
      "$MICROPHONE_DEVICE:capture_FR" \
      "$CALL_INPUT_DEVICE:input_FR"
    notify-send -t 500 "unmuted"
fi
The End #
That's all! Feel free to reach me on Twitter if you have any questions.